Tuesday, February 24, 2009

Merchant's Bank upgrade


Hey... Wow another blog entry! How exciting...hmmmm....

So I have completed two middle tower sections on my Merchant's Bank building. The first was part of the building kit the second is one of two add on kits. So yup... I've got one more to finish before I do the top. I've spent some time on paint matching this model as I weather each section as I go. So I've tried my best to match the weathering pattern etc. This last add on section I probably spent about an hour aging the building.

At first I was worried that this building would be too tall and thin with three middle sections....now I think you could pull off four. I'm going to see how this looks once I've finished it before I decide to buy one more add on kit. Though I think I'll stop at 3 mid sections. I am so excited to see how awesome this building is looking. It's going to look fantastic beside my Hilton Hotel skyscraper.

At first I put in the window blinds that come with the kit but I didn't like them so I removed them. I'm going to work over this week on window blinds and what would look authentic and natural. I would also like to add lights to this building in the future so I'm going to have to be creative.

Anyways these buildings are absolutely awesome. I should have this one done by the weekend....then on to one of my next ten projects to do! :D

Cheers all, Bob

Saturday, February 21, 2009

Merchant's Bank (BASE) Paint and weathering...


I decided to upload two photos on the base I finished tonight. Well not really finished but finished for now. :D I always have a tough time deciding what colour to paint my buildings and how to age them etc. This building is going to be very tall and goes together in many sections. Also before this building goes together all the windows need to be in and interior details etc. For this reason I wanted to age and weather the building as I build each section and before I place the windows in. Nothing looks worse than paint on windows, except for maybe globs of glue squeezing out between seems etc. :D Getting back to this building I had a very tough time deciding what colour to paint it. I also wanted to keep as much of the lazer cut details of the building so I decided to paint it...yes believe it or not, with an aerasol can. Not my usual choice. However I touched it up with an assortment of coloured washes and dry dry dry smudgings.

The first coat I used a satin finished Krylon fusion paint...almost a concrete colour. I did two coats with this paint from different angles so I got the inside window jams from all sides. The Krylon paints even in the satin finish have a very glossy look... to me anyways. I then did a white wash ( deluted White polyscale paint). They mentioned in the kit instructions not to use alcohol on this kit as it eats the Acrylic model. Once the white wash was done it looked pretty bad! hahahaa. I then used various dry brushings of concrete mix with Reefer black, C.P. Grey, then a final dry brush over with Concrete. By dry brushing I mean I get a colour I like get it in the brush and work the paint till there's hardly any paint left in it. But enough to work the model for the right painting effect, I like. It also helps to blend, smudge and blur the different colour tones to create a realistic dirty building look. I still need to add the side walks back to this building! :D

Anyways I'm happy with how this model is looking. I'm hoping it won't look too gawky with the two extra add on kits. I've yet to see this building made with even one add on kit. So I'll see probably tomorrow how this building turns out. Again it should be almost 2 feet so looking at the size of the base right now I'm crossing my fingers it'll be o.k. I could always buy another building to eat up my extra add on kit! :D

Cheers more to post on this building over the weekend! :D

Bob

Friday, February 20, 2009

Merchant's Bank (CMR Kit)


Hey everyone!!! I finally got into building my Merchant's Bank (CMR) kit tonight. I am excited to get this building done. It'll be a significant building in my layout standing at almost 2 feet or about 320 feet in scale. I'm building this build opposite to how the photo looks in this ad from CMR.

It's funny as the sidewalks come installed in this kit and the sidewalks come to make the kit the way I'm making it. There's also a mistake in the instructions as to what I discovered and to what my friend Don discovered as well. The back wall is show in the instructions to be placed opposite than it's suppose to. Luckily I was able to unglue the wall and reverse it's positioning with out breaking anything.

If anyone needs to redo a part in these models just add a lot more of the glue around the section you want to separate and gently pull apart.

I'm excited to see how this model comes out as if I'm happy with it I may order a second one to go right beside it and build it oposite to the one I'm building now and build it either one section short or one section higher or maybe I'll remove the top section....something to make it a bit different than this building. But all things in time!

As you can see in the photos, the kit comes in a small box with all parts in highly detailed white Acrylic. The kits go together very easy, but unless you've built the building a first time...follow the instructions very closely. It's very easy to break some of the more delicate pieces and ungluing some of these parts can be very difficult. I'm currently painting this bottom section. I hope to have this entire building completed over the weekend! :D

cheers all,
Bob

Wow, I'm just starting to feel better as I've had a pretty bad cold. This is why I've been off line for a couple of days. I also really did nothing to my train layout progress over this time. However I did do one more add on section to my Fidelity building. I've got one more to do on top of this however I'm missing a major piece and am waiting for it to arrive from CMR. I have to say that Custommodelrailroads.com has just an outstanding customer service. I'm am completely impressed with their business.

Here's the current progress photo of the fidelity building...

One thing I've learned is when painting this building via brush and polyscale paints is add a small small small amount of water to the paint and shake in really well. By doing this and by being careful with the brush and thinner layers you can keep the brick details much better. you can see the difference between the top add on section and the middle add on section. I am going to go over this middle section again and clean up the brick lines a little bit better. However it's going to get aged and weathered yet. This building also still needs windows, sidewalks, signs, people, tree(s), awning etc. This all being said, these building kits are awesome. I'll keep posting my progress reports on all four of my CMR building kits.

Cheers all,
Bob

Tuesday, February 17, 2009


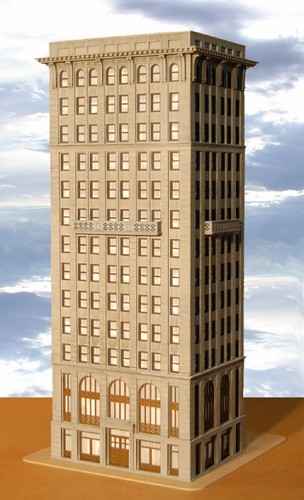
I decided to make my second blog entry tonight. I've been working the last couple of afternoons and part evenings on creating a building kit made by Custommodelrailroads.com I bought 4 kits from them and this one is the smallest, called the The Fidelity and Guaranty Company Building with 3 add on kits for it.

I was excited to get these and upon starting this building I have to say they are pretty easy to put together although you need to be careful in somethings when putting this building together.

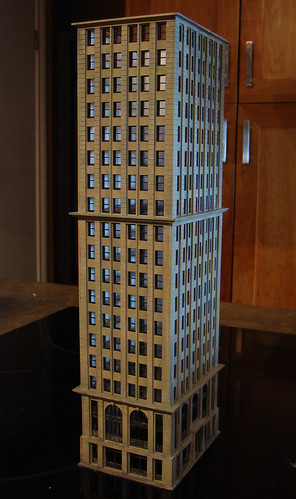
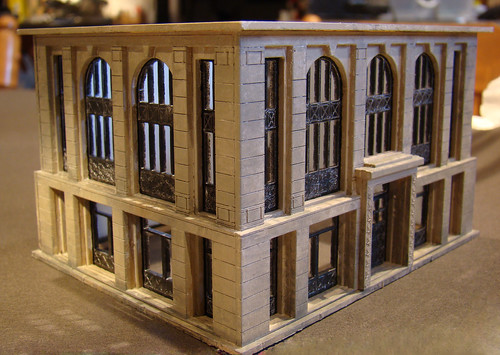
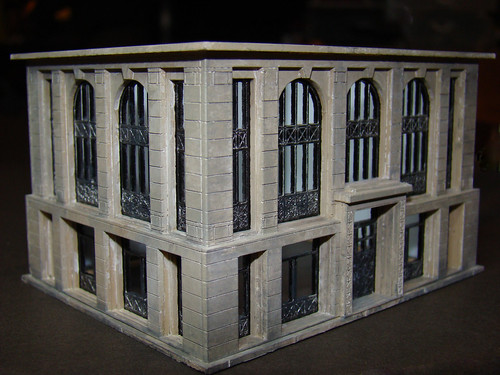
A. Don't glue the entire building together with out painting it. As you can see in my first photo I've got one add on kit done, though no windows, no weathering, no building details and I still have to add two more extension kits to it. The way I did this was per the instructions...especially for the first one. I put each module together minuse the window frames. I painted the completed modules and the window frames seperately. At first I painted them a white sating Krylone fusion paint so to act as a primer. Then I hand painted the modules and the window frames seperately. once I did an additional 3 coats of paint for both parts I then glued the window frames behind the modules. It works well just don't add too much glue or the paint will run into the seems and ruin the paint on the edges of the window frames and building facade.

B. if this is your first CMR kit make sure you follow the instructions thoroughly. It'd be very easy to make a mistake.

The detailing is really nice on this building. However I'm a bit disappointed with the scale. It seems to me when measuring this building so far next to my current buildings that it seems a bit underscale. It's not to the point where it looks out of place but putting my current unfinished Fidelity building beside my Hilton hotel it does a bit. So I'll have to be careful as to what buildings I put this beside. Currently my Fidelity Building is "the building" and one add on kits currently reaching 9 inches in height. When completed it will be almost exactly 19 stories and 14.5 inches. Today most office buildings in Current North American cities is about 12 to 13 feet or about one inch in N scale. So in doing some math on my other buildings this building will fit in nicely with some of my other models which have similar floor heights.

To be honest this isn't a horrible thing as if you ever look at cities the variences in heights between buildings of the same story limit is quite amazing. For instance I live in Victoria Canada. It's a medium size city and is the capital of B.C. Unfortunately Victoria has some of the most strict height limits of any city it's size. That being said we have lots of mid rise buildings. I bring this up because there's a building called the Orchard House http://farm2.static.flickr.com/1284/1026623446_c035b1c362_b.jpg which was built in the 1960's it's height is 204 feet... I hate meteric...grrr and is 22 stories tall. We also have a CIBC Bank tower at only 12 stories tall http://farm1.static.flickr.com/216/523026957_2efbab0cce_o.jpg This building measure 165 feet in height and a newly underconstruction condo at 24 stories is coming in at 238 feet.

So the CIBC bank (1976) office is.............. 13.75 feet per floor,
The Orchard House condos (1969) is ....... 9.27 feet per floor,
The New Hudson Condo tower (2010)...... 9.92 feet per floor.
Fidelity Building N scale............................... 10.18 feet per floor. (should be in the 12 foot range)

I've measured the floor ratio for the Fidelity building at 19 stories and at 14.5 inch at 1:160 scale and I've got.. 10.18 feet per floor.

So not bad for a condo but a little under scale for the era.

All being said, it's a great building with a fantastic design, rigid construction, flawless detail, awesome tollernance and easy to construct if done properly.

I'm excited to see how the other buildings turn out. I'm going to add some cool details such as trees, aging, people, awnings, signs, roof details, and excitedly the next two add on kits.

Cheers,
Bob

Hey guys, This is my first ever blog so I'm going to learn as I go. This in fact is my first ever Blog entery! How exciting hey. I've decided to start a blog on my N scale city layout that I've been working on (and off again) for about 10 years now. I have mind you only really started to take it a new level over the last couple of years. It's a lot of work but it's fun and enjoyable. Thanks To New people in the hobby from Chris at http://rotatingcoupler.blogspot.com/ Tim who's a contact on my Flickr account http://flickr.com/photos/32654421@N06/ Don, Kirk, Greg, and others on the newly establish Urban Modeling forum at http://www.nscale.net/forums/modeling/structures-general-scenery-techniques/urban-modelling-0 I've been constantly motivated by the highest levels of modeling and helpful enthusiam and encouragement.

N scale is either 1:150 scale or 1:160 scale depending on the country you are living in. In Japan almost all N scale is 1:150 where as here in North America it's 1:160 scale. In the past N scale has been a much less popular scale than H.O. (1:87) scale. However in the past years N scale has become much more popular due to people living in condos (thus smaller area for layouts), and the fact that prices are a bit cheaper. In places like Japan H.O. is very Rare. A lot of my City structures have been made by Japanese Products not offered in The U.S. or Canada. The other hard part in finding N scale skyscrapers and city structures has been the fact that very few modelers model Urban Layouts. Thus products have been hard to find and I've resorted to a lot of kitbashing, a little bit of scratch building ( I want to do a lot more of this) and other means to create city buildings.

New products....

I have been very extremely impressed with the new products now coming online with N scale. Some amazing products I never thought would be possible. I've spent the last two years emailing and sometimes calling companies with ideas and wishes, and it's been amazing to see how well they listen. Anyways on to my blog. I've got hundreds of photos So I won't post them all on here. I have a Flickr account where I have been hosting a lot of my images and lately step by step details in specific building creations!

Regarding my layout... Well I don't have one yet...but...
This has and is and will be a very tough layout to complete. I've already put in thousands of hours of modeling and it's not even close to half way. Though fun right!!! Well sometimes...hahahaa.

This is where you can find some of my N scale building photos and mock city photos...
http://flickr.com/photos/55063726@N00/collections/72157612768739708/
Each on of these sets can contain over a hundred photos each though some may only have 20 0r so.

Well this is my first entry.

I'll leave you with a simple photo I took about two weeks ago with about 80 percent of my buildings placed in a mock set up.

Anyways thanks for reading my blog...hopefully it'll get better as I become more use to this blogging thing! :D

Cheers, Bob